Salted Ham

This is what hams can look like after they have sat in salt (sodium chloride) for 3.5 weeks. During that time they lost close to 14% of their weights as serum moved from the flash into the embedding salt. As I write they are sitting in the refrigerator for a “burning off” period (1 week) during which the concentration of salt will equalize throughout the muscle.
By Friday they should be ready to wrap and hang for at least one year.
Because the foot has been cut off, I will also coat the end of the shank with lard to prevent infection by bacteria and fungus.

The Charcutier’s Best Freind

Bloody curr more or less can say sausages.

Our thanks to Trig for suggesting the post.

Bresaola

Here are two stages in the life of air dried beef in the style of the bresaola of Lombardy. The piece in the foreground was taken out of the cure today, rinsed and tied, and hung in the aging room where it will dry and mature for 4-6 weeks. The two specimens in the background were hung at the beginning of July and are ready to be sold. All three are made from whole eye rounds from our grassfed cows (foreground) and bulls (background).

Posted by Picasa

Curing salt for pancetta

Posted by Picasa

The Pork Fat’s Tale

Okay, so the title is a reference to Canterbury Tales and probably indicative of nothing more or less than I do not know what to call this post about one of the many acts of charcuterie that I committed this early summer week. Time to move on…

A Quickie

I am just about to blow out the door to catch a train to NYC to meet up with Mike Pardus, Kris Ray and a bunch of other culinarians for a walking tour through the markets and eateries of China Town, so I am not going to spend too many words on this post.

Here is a slide show of some of the work I did at the farm last week.

And some follow up shots of the same product the way they looked this week.

LATER!

For Pork Lovers Only

I took this picture of forty pounds of fat flensed from the outside of pork loins (fatback) yesterday (6.19.09). I used some of the fat for salami and and some I cured as lardo. I’ll follow up with shots of the salami (I made 100 pounds) later in the weekend.

Posted by Picasa

Slow Salami Sunday UPDATE

Last Sunday I wrote about how I acted on an urge to make a batch of Tuscan style salami. The post outlined the process up to the beginning of the fermentation of the meat. Today’s post picks up the process on Wednesday when I retrieved the meat from the refrigerator in my garage and ground it.
It was my intention to stuff it at home too. But I decided against it when I realized that the stuffing attachment for my Kitchenaid stand mixer would ruin the texture by pulverizing the fat -which I wanted to remain in ~1/4″ chunks- as it worked along the worm gear. So I took the forcemeat to the farm and expressed it into hog casing with the piston stuffer then brought it home to age.

Salami Stuffing Process

At the farm I always age the meat in the cheese aging room which is well controlled for humidity, temperature and air flow. But whenever I’ve aged meat at home in the past, I’ve winged it by hanging it in the basement and crossing my fingers. Well, I’ve decided not to do that anymore and build an aging room. But before I start shooting nails into the foundation and putting up studs I’m going to tinker around with different prototypes by way of determining how big the room needs to be, how often the air needs to turn over etc.

Here is my first prototype aging room. I put it up on Saturday in about an hour. Humidity is controlled by a vaopirizer hooked up to a timer. The air is turn over twice a day by a small fan (also on a timer). I expect that future versions of this will include a larger humidifer with a humdistat and a larger much slower turning fan.

Aging Room

Slow Salami Sunday

I must be more of an idiot than even my 9th Grade math teacher believed me to be. The guy was a former Wehrmacht commando and competitive water skier so you can imagine how convincing his opinions were.

Sunday (6/7) was a beautiful sunny spring day. I had lots of garden related stuff to do: a huge pile of composted mushroom soil to move, shrubs to dig out and replant and a googoplex of weeds to pull. But instead of taking the rational course and spending the entire day out of doors, I spent about a third of it in the house starting a batch of Tuscan salami, taking pictures and writing this post.

Okay, no use beating myself up over doing something that I love to do, I suppose. Here’s what I did today with a description of how I did it.

Step 1) Determine weight of available meat and the weight of the proportion of fat.

I had a bone-in picnic shoulder ham from the supermarket. Since I could not use the bone or skin in the salami, I had to filet and skin it and determine how much meat I had to work with.

After the bone and skin was removed I had 2576 grams (~92 ounces) of meat. I like the salami to be smooth and fatty so I decided to add some belly fat at the rate of 20% of the meat or 504 grams (18 oz). Fatback would have been a better choice because it’s firmer and holds up better during aging (So slap me!).

Step 2) Write a recipe from the master recipe in my secret book of salumi recipes.

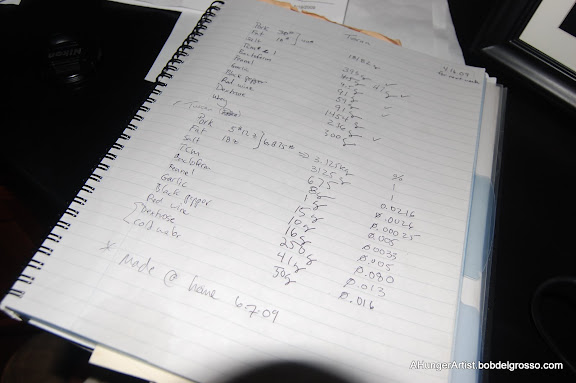
Since my secret book has all the data for what percentage of the meat and fat each ingredient should be. All I had to do to work up the recipe was add up the weight of the meat and fat and multiple that number (3125 grams) by the percent value of each ingredient ( Column III in the table below) and determine how much of each thing I needed (Col. II)

Ingredient Weight (g) % ingredient Notes
Meat 2576 1 Grind fine
Belly fat 504 0.20 Grind coarse

Total meat and fat

3125

1

Salt

67.5

0.0216

Instacure #1

8

0.0026

Fennel seeds, whole

15

0.005

Toast them
Garlic, fresh

10

0.0033

Fine mince
Pepper, black

16

0.005

Coarse grind
Red Wine

250

0.08

Dry
Dextrose powder

41

0.013

Bactoferm F-RM-52

1

0.00025

Disperse in water
Water, cold

50

0.016

If I’d been at the farm where we almost always have some lactobacilli rich whey, I’d have omitted the Bactoferm and used the whey to lower the pH instead. Whey is way cheaper to use than Bactoferm and works the same way: the bacteria ferment the meat giving it a slightly tart taste and reduce the nitrate in compounds that brighten the color of the meat and destroy pathogenic bacteria.

After the meat has fermented for a few days in the refrigerator, I’ll grind it. Then I’ll take it to the farm where we have a proper sausage stuffing machine, stuff it into hog or beef casings, tie it off, bring it back home and hang it in the basement. I’ll try to remember t take pictures of the rest of the process and post them here forthrightly.

A gift of Globe

Jearl Pino, one of the guys who likes to come around to the farm and help with various projects, bought a Globe slicer from some guy who advertized it on Craigslist. I suppose the machine was too big to keep at Jearl’s house because he asked if he could leave it at the farm. We are free to use it at will and I’ve already begun breaking it in. And check this out: he paid $75.00 for the thing! It’s probably thirty years old but it’s in perfect condition.

Today I used it to slice up a prosciutto made from Berkshire pork. I hung this about 12 months ago. It’s cured only with salt (sodium chloride) nothing else, and tastes just like the real thing -I suppose because it is the real thing.